
Using Git#
Last modified: 18 Jun 2024
Click on the YouTube link below for a video guide (5 minutes). Alternatively, scroll down to follow the written step-by-step instructions.

Reproducible and reusable research#
The UK LLC model promotes a culture of reproducible and reusable research where users generate reusable research outputs (including derived data, syntax and documentation) and deposit these back into the resource to inform other users’ research, to drive efficiency, and to enable follow-on or replication studies (see figure 1). UK LLC’s Team Data Science approach is informed by the UK Reproducibility Network and the FAIR Guiding Principles for scientific data management and stewardship.
All researchers must deposit reusable research outputs into the UK LLC resource that are:
Necessary for other researchers to understand and reproduce the research and/or
Useful to others for reuse within their own project and/or
Necessary for external stakeholders (including participants and the public) to understand how data are being used in the UK LLC TRE.
The UK LLC system ensures that researchers receive full attribution for the reusable content they generate.
Note: UK LLC cannot guarantee the quality of reusable research outputs. It is the responsibility of the researcher to check reusable research outputs prior to inclusion in analyses and subsequent interpretation.
Figure 1 The inter-relationship between projects and reusable research outputs in the UK LLC TRE
Note: the dashed arrows illustrate the re-use of research outputs from one project to another (with prior approval(s) by LPS and/or UK LLC Linked Data Review Panel in the case of derived data)
UK LLC Git repositories#
To facilitate reproducible and reusable research, UK LLC maintains Git repositories where, for each project, researchers add cleaned and documented reusable research outputs. There are three distinct UK LLC Git spaces:
Each approved project has its own Project GitLab within the UK LLC TRE.
There is a Shared GitLab within the UK LLC TRE for sharing code between projects.
Each approved project has its own Project GitHub (within the UK LLC GitHub) outside the UK LLC TRE.
You’ll find GitLab available on all UK LLC SeRP desktops. Your permissions will already be mapped to the appropriate group.
The table below summarises the read/write/access permissions for these three UK LLC Git spaces that are applicable to each potential user group.
User group |
Internal Project GitLab |
Internal Shared GitLab |
External Project GitHub |
|---|---|---|---|
UK LLC Data Team |
Read/Write |
Read/Write |
Read/Write |
Researcher within their project space |
Read/Write |
Read only |
Read/Write |
All researchers |
No access |
Read only |
Read only |
Public |
No access |
No access |
Read only |
Creating a GitLab repository#
To access GitLab within the TRE open a browser (recommend Mozilla Firefox) navigate to https://gitlab.ukllc.ukserp.ac.uk or click on the “UKLLC GitLab” icon from the SeRP desktop. If you have not already created a GitLab account, you will be asked to do so here. Log in using your SeRP credentials.
If this is your first time using GitLab, you’ll need to set up an SSH (Secure Shell) key pair. See SeRP UK guide on how to do this: https://docs.hiru.swan.ac.uk/display/HDK/GitLab+and+SSH#types-of-ssh-keys-and-which-to-choose. Having an SSH key set up is essential in allowing you to push to and pull from repositories.
Once SSH keys are set up, in GitLab select “Groups” > “View all groups”, then “UKLLC” from the main menu.
Here you should see the Subgroups you belong to. This should include all projects you belong to and “ReadAll”:
To create a version-controlled area within your project space you’ll need to create a “project” (known as a repository in Git) within your subgroup.
To do this, click on the subproject you want to version control within (in this case LLC_9999) and click “New project”:
Select “Create blank project”.
Enter project name, this should follow the naming convention <project_number>_<descriptive_name> (e.g. “LLC_9999_GP_asthma_diag”), deselect “initialize repository with a README” and click “Create project”:
Decide/create a folder in your project working space (Windows Explorer) containing files for version control. This folder should contain syntax and documentation only, not data. Data should be stored in a separate folder.
Open Git BASH and cd (change directory) to folder “S:#insertProjectName##insertFolderName#”, e.g.

To initialise Git within this folder type git init:

You’ll need to add a “remote” to tell Git which remote repository in GitLab is tied to the specific local folder on your computer. The remote tells Git where to push or pull from. For this you’ll need a project path.
To get your project path go to the project page in GitLab, click the ‘Clone’ drop down and copy the address from ‘Clone with SSH’ cell:
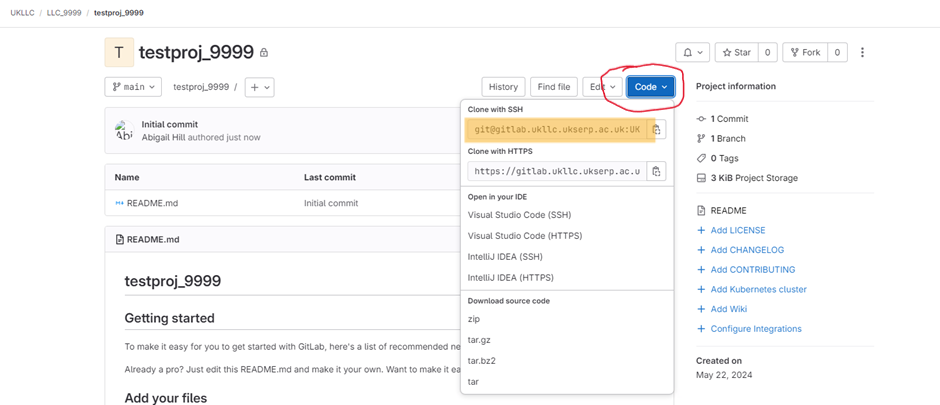
Once you have this, in Git BASH type: git remote add origin #insertProjectPath#:

Switch branch to main with:

To add all files in the folder use: “git add .” or to add specific files use: git add #specificFilename#, e.g.

To commit changes: git commit -m ”commitMessage”:

To push your local commits to the main branch of the origin remote:

Dos and don’ts#
Files in the repository should follow the UK LLC Naming of Projects and Data-related Outputs Policy
Repositories themselves should follow the naming convention: <project_number>_<descriptive_name> (e.g. “LLC_9999_GP_asthma_diag”)
Please keep data files outside your repository and store in a separate folder. This is because these files cannot be shared between projects.
Adding syntax & documentation to ReadAll GitLab and external GitHub#
Note: Failure to make reusable research outputs available will risk future access to the resource.
File outs#
See the Moving files in and out guide to understand how to submit a syntax or documentation file out for review.
Documentation must be sufficiently detailed for other researchers to understand the syntax.
Content of the syntax and documentation must not increase identifiability risk of UK LLC participants.
Syntax should follow good coding practices, which includes meaningful naming, appropriate level of comments to give context and well-structured.
All approved syntax and documentation files should be uploaded by researchers to their Project GitHub on the UK LLC GitHub. As soon as content is added, researchers should switch the setting of their GitHub from ‘Private’ to ‘Public’.
The UK LLC Data Team will push approved outputs to the GitLab.
The UK LLC Data Team will check that each project’s GitHub corresponds to the internal GitLab and the File Out Log.
GitHub#
To push your syntax and documentation to GitHub follow these steps:
Navigate to https://github.com/UKLLC/ and sign in.
Find your project repository e.g. LLC_0000 and click to open.
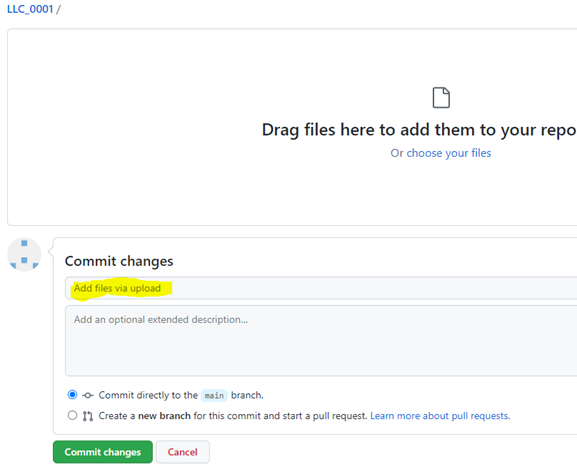
Select “Add file”, selecting option “Upload files”:

Drag/choose files, adding a commit message where highlighted before selecting “Commit changes”:
Note: your project repository will have a pre-populated readme file with important project information e.g. lay summary. Please feel free to add to this readme to give context to your files.
To set your repository to Public visibility:
Navigate to the main page of the repository.
Under your repository name, click Settings. If you cannot see the “Settings” tab, select the dropdown menu above your repo name and then click Settings.

In the “Danger Zone” section, to the right of “Change repository visibility”, click Change visibility.
Select Public visibility.
To verify that you’re changing the correct repository’s visibility, type the name of the repository you want to change the visibility of.
Click I understand, change repository visibility.
Derived data#
Derived (or returned) data products can not leave the TRE. Researchers can request access to them in the same way as for LPS and linked datasets.
The file path of the datafiles containing derived outputs must be shared with the UK LLC Data Team via support@ukllc.ac.uk.
This email must also supply the project number and GitLab repository containing the accompanying syntax and documentation used to create and document the derived data.
Derived data without syntax and documentation will NOT be processed.
The contents of the data files and accompanying syntax and documentation must not increase identifiability risk of UK LLC participants and should contain the following metadata:
o Name of dataset
o Dataset description
o Full name of dataset creator
o Up to six keywords
o Whether the dataset contains sensitive information e.g. mental/sexual health
o Data sources (this only needs to include the names of the LPS that have contributed data and/or the linked data owners (e.g. NHS England), rather than the names of the individual datasets)
o Value and variable labels.
Using another researcher’s syntax#
If you wish to use code developed by another researcher you need to clone the repository from the ReadAll GitLab:
Within the SeRP navigate to https://gitlab.ukllc.ukserp.ac.uk or click on UKLLC GitLab from the SeRP desktop. Recommended browser: Mozilla Firefox.
From main menu select “Groups” > “View all groups”, select “UKLLC”, then select “ReadAll”.
Here you will see all repositories returned to UK LLC, select the repository you want to clone and click on the Clone dropdown and copy the text under “Clone with SSH”:

Open Git BASH and change directory (“cd #insertFilePath”) to folder in your project file storage area where you want to clone files to and type: (replacing the repository name with the one copied in the previous step):

If successful you’ll have a folder written to your chosen directory containing the repository contents.